Archive for the Uncategorized Category
Someone asked for some details about how I made the tracks in my album and I thought it would be fun to go over some of the things I think stand out and that I can remember. All of them started as modular jams. The patches weren’t really technical or ‘clever’, just a lot of analog oscillators and filters which have lots of inputs and outputs for audio and CV, and lots of modulation options, which I used extensively. When I first did these jams, about 8-9 years ago, my eurorack setup was mostly modules by a maker called Blue Lantern. He was selling complete systems at a pretty steep discount so that was my entry point into the format.
Blue Lantern modules can be very cool because, at least for those earlier ones I have, he would have a lot more ins and outs for modulations and weird controls that you wouldn’t see on other modules that were using the same circuit as the source for their design. They’re almost like ‘circuit bent’ versions of these common circuits. One of the oscs I used is the Transistor Pyramid Core VCO which has two types of synch, which sound different, exponential and linear FM, which sound different, many output shapes and PWM, and it just sounds great (based on a Buchla design). I had that and another BL osc with similar features, and a lot of the grungier sounds I got on the album, the growly, gurgling bass sequences that also have a lot of higher freq stuff going on, were achieved by cross-modulating those two oscs in various ways.
For most tracks on the album I wasn’t super concerned with having elaborate melodies or sequences, I just used a Blue Lantern arpeggiator module to generate some arpeggios, and I would turn the knobs on that live to get different notes brought into the sequences it made, which I would be using to control the oscs. The oscs would be sent to various Blue Lantern filters which had the same design philosophy as the oscs- built on designs that have been around for decades and used and reused by countless makers, but adding extra features everywhere possible for more sound design capability. This really resonates with me. So a lot of the tracks on the album were based around me just patching these arpeggiated oscs so they are mangling each other, and then going into these filters which were further mangling them, until I got a nice soupy wall of sound.
I would do filter sweeps and other adjustments live. Another key module for at least some of the tracks is the Synthrotek Eko, a very cheap and simple PT2399 based delay. It can do some simple echoes but if you modulate the delay time you can have everything collapse into a black hole and explode again in pure chaos. It’s pretty crazy and fun, and for a few tracks I would ‘rehearse’ a sort of compositional idea where I would use it to collapse everything into chaos at just the right time. In some cases I had the major elements of the track going into it and I would use adjusting the delay time to change the tempo and rhythm of everything.
There were a lot of other modules being used, mostly other BL ones, and I would just keep patching them together, using everything in my rack (maybe 25 modules would be patched in a big spaghetti mess, to make each of these tracks), to create these patterns that could keep going on their own, and sounded pretty nice to me, then I would record myself tweaking knobs live for a few hours. A few years later I began editing out some of the best bits and turning them into tracks. The original recordings were usually MONO mixdowns, and probably driven a bit too hot somewhere in the chain because I wanted a crunchy sound. I also usually avoided having amplitude envelopes on the oscs, opting for a continuous wall of free-running oscillator sound. The end recording obviously was pretty lacking in amplitude dynamics.
When I started editing, I wanted to introduce some dynamics back in to the recordings, but keep the spirit of the jams intact. I used a lot of EQing, with various plugins, including some Acquas, and even some of my own Nebula programs. This brought some of the frequencies out and enhanced some of the rhythmic qualities. I would edit some bits out that went on for too long. I used various methods to introduce some stereo image to the recordings. In most cases what you hear is still basically the modular jams but highly polished up and enhanced. Tracks 1 and 7 are exceptions. For track 1, I took the soupier bassy gurgling part of the track and processed it very heavily with Image Line’s Harmor, which is an image resynthesis plugin. I used it to harmonize the modular gurgles and create the entire ‘chord progression’ that you hear in the track, by using different harmonizer settings for each harmony. I used multiband processing to leave some of the content of the original recording unmolested by Harmor, and just panned it around instead. Multiband processing was heavily used during the editing/mixing, often to pan higher frequencies around or to add other effects only in certain frequency ranges.
Track 7 was created after most of the other tracks and I used a module called the Grendel, which is a vocal formant filter. The original recording was too monotonous so I sliced it into phrases and pitched some of them up and down to bring in some dynamics to the pitch. I did the pitching mostly just by using Reaper’s built-in pitch shifting ability for audio clips. I experimented with the different available pitch shifting algos for each slice, discovering that the nature of the synth recording (being kind of squelchy), really worked well with some of the more lo-fi pitch shifting methods to get really nice gritty sounds. The end of that track was processed with my Sooper Time Tube stereo program.
I did a few overdubs, like the barely audible chords in track 7 that happen in a few places, but especially in track 8. The intro to track 8 was filtered with different filters from my ‘mixing filters 3 hycor’ Nebula filter pack. Before that it was just a constant bassy gurgle but the different filters and applying a fade in made a nice intro. I think this this track goes on maybe a little too long, but it might have my favorite part of the album starting at 7:58 (those background sounds are overdubs). The squeeky sound that echoes in track 10 used my Nolard tape delay programs, various settings for each echo. The part starting at 1:41 in track 2, uses an unreleased program I made from my orban stereo synthesizer (a pseudo stereo comb filter unit). The effect gets more and more intense and I think it makes everything sound like it’s getting bigger and bigger and coming from outside out of the boundaries of the speakers (or headphones).
Track 3 also used Harmor. Each section of the gurgly synth is processed differently with Harmor, then they were processed through my modular again (mainly using a module that clones the Korg PS-3300 filter bank), and I came up with a ‘drum’ overdub, created with a modular patch and sequenced in a way where it seems to be related to the synth patterns, but in a drunken way. Track 4 is the only one that had different elements recorded separately, so I just panned those around to get a stereo mix for that one. Tracks 5 and 6 are the most ‘pure’ in the sense that what you hear is very close to the original recordings, just a little editing for time, EQing, and some of my Nebula reverbs were applied (like with every track), however the intro and outro of track 5 was filtered and processed a lot (ends with a big wash of my BX20 reverb).
Track 10, the last track, is from one of my first ever modular recordings (2014?), and it’s actually two takes of a more planned out composition, edited together. That one used the cheap Eko delay module a lot, but not for echoes, just for texture and rhythmic changes. I really like the bubbly textures I got here, in the first half. The really low pitched bubbly sounds were made by creating a delayed copy of the main bubbly synth recording and pitching it down (and mangling it a bit) with an old spectral FFT plugin called DtBlkFx.
I used many many instances of Nebula, with my own products. Probably every product was used at least once somewhere in the album. My tube radio and cassette programs were used pretty extensively to alter the tones, and my various reverbs were used everywhere too. I used Waves’ F6 dynamic EQ whenever I needed some really surgical EQing (really nice plugin). After the mixes could have been called finished, I decided to record every separate element (everything was recorded to mono originally but now I had many layers I had separated out of the recording in various ways, and some overdubs and effects tracks) to cassette tape and back using my Marantz deck. This is the deck I used to make Cassette Deck 3. I had used my Nebula tape programs but I wanted to go beyond what the programs can do. I recorded every track in each mix, using various tapes (and tape types), in single and double speed mode (this deck can do 2x speed), and redigitized the output. This was done in one pass while monitoring off of the tape, so the deck was being used as an effects loop, and this allowed me to hear exactly what the saturation on each sound sounded like in the context of the rest of the mix.
I think the main benefit of that was just the tape compression. I didn’t really drive the tapes hot enough for distortion usually. But the compression brought the mixes together more than they were previously. Track 9 is one exception where I used various levels of tape distortion towards the end, to make it more dramatic. After everything was ‘tapified’, I did the final mix-down in my more recent modular system, using a really high quality input/output module and several mixer modules. In a few cases I applied some subtle filtering or other processing while doing this. Then I used my and Michael’s M-EQ for mastering, with some subtle C660 compression.
There’s almost surely some things I’m forgetting here, but these are probably all of the major updates.
- new skins allow you to press LED buttons on the skins to switch between the programs. this really improves the experience; especially with the LFO programs where you can select different LFO shapes with the push of a button. there are 3 separate skins. one is for the EQ boost/cut, bandpass, notch, and pass-through programs. another skin has the LFO programs, and the last skin has the envelope follower effects.
- it’s now called Yourei EQ/BP/N v2
- i made the ability to use this release as an EQ a more up-front focus of this release. the peak boost and cut ability is easier to access and use than they were in the old release (you could use the programs for these purposes but it was really finicky to set up for the boost). the original hardware didn’t offer these (it only has bandpass and notches), i made them by combining the bp and notch samples with the pass through samples, which allows us to have some really nice peak and cut bands for EQing purposes. these are probably the most commonly useful things you can do with the programs in this release so they have been made a focus. It’s a really nice sounding boost or cut that can be placed anywhere in the frequency response.
- the low end ripple that happened as a result of truncated impulses has been removed. there is some subtle ripple that appears if you have a sharp filter at low freqs, but that is seen on the hardware too, so it’s accurate.
- 48 and 88.2khz sample rates were added.
- many of the programs combined the 3 filter types (notch, bandpass, peak) into one program, allowing access to all 3 in the one program. that sounds good but it drastically increased load times (due to having to load the samples for modes you might not even need), and the knob to switch between the modes worked in a confusing and not very good way. now the notch, bandpass, and peak all get their own separate programs, which allows some programs load faster. not having them all in one program is no loss because the new skin has buttons that you can use to switch to whatever mode you want. this is actually a really big improvement in terms of organization and usability.
- all programs load at least a little faster than before. some load a lot faster. the main notch program still takes several seconds to load on my older PC, but it has almost 3,000 samples and there’s no way to make it load faster.
- LFO/envelope programs have smoother motion because i’m using a faster program rate. this isn’t as noticeable at slower modulation speeds but it sounds more authentic to analog modulation (like you’d get in a modular synth for example) at faster rates, especially with the 96khz programs. this does require slightly more CPU compared to the original programs, but i put those out over 10 years ago! the notch at its widest setting sounds like a nice and smooth phaser.
- the LFO width control works in a better way now. the % you set it to will always cause the LFO to travel that % of the way, between where you set the base frequency, and the maximum frequency. this means the LFO will never ‘peg out’ at the highest frequencies, like it could in the past with some settings. kind of hard to explain but it’s just better this way.
- the envelope follower programs are more useful now. in the past there was a bug (this was actually due to a bug in nebula itself), where the ‘attack’ would usually always be instant. you wouldn’t actually be able to get the filter to smoothly slide up (or down) during the attack, before returning for the release. it would just kind of jump to the highest (or lowest) point, then slide back for the release. now you can actually get slower attacks. this really opens these up as nice little auto-wah effects. these also got a threshold control now which gives you an easy way to control how much ‘travel’ the filter does.
- evened out the levels of the bandpass/peak filter across the range. they’re still not exactly the same at all settings but neither was the actual gear. You probably never noticed the levels being uneven in the past because it was usually subtle, but it is improved now.
- removed the external sidechain envelope follower programs because for whatever reason, years ago, Acustica removed the ability to introduce an external sidechain into Nebula.
- feedback is only found in BP modulation (or the for automation) programs, because it’s just not good in the notch and peak programs. the reason is because those programs have the entire frequency response in them, and all of it gets fed back, which just gives you a comb filtering effect. with the bandpass programs only the audio around the cutoff gets fed back.
- the tone programs have been updated to match the updates i gave them for the ‘Cuptones Vol 1’ release, which includes cleaner harmonics and reduced artifacts.
- new manual.
I will be sending out links to the newly updated files by email soon. Here are all of the updates to Tube Radios Direct-
*added new ‘hot’ programs which allow you to get much louder distortion than ever before. i’ll stake my reputation that few if any Nebula programs out there can do anything like this level of distortion, without becoming nasty. these programs do not have the infamous ‘chirp’ that has plagued Nebula for ages, when driven too hot. of course, whether these distortions sound ‘good’ will depend on what you’re processing, as with any distortion. but they absolutely can be made to do heavy distortion and still sound great. this is the biggest and most important update. when i originally sampled these radios (about 13 years ago) i got a range of dynamics sampled, from queiter levels without much distortion, to much higher levels with lots of harmonics. those higher levels could never be reproduced until now.
*the tube compression aspect of the sound (caused by tube saturation when the radios were driven hot) was stripped out of the main tone programs. the tone programs still react dynamically- the frequency response usually slightly changes as a program is driven hotter, and the harmonics also respond dynamically. the actual compression has now been moved over to a separate batch of programs (with their own skin for selecting them!) that only do the compression- your tone is completely unaffected by them. doing it this way is better for many reasons-
1) having both the tone and compression combined in one program doesn’t allow instant reaction due to limitations with nebula. so we couldn’t have the realistic instant squishing effect a radio would do.
2) this also allows you to use the tube compression without a tone program, opening up new possible uses. on default loading they provide instant squishing like the radios would, but i added an attack and release control (modeled from one of my compressor releases), which when adjusted allow you to use these programs in any situation where you need compression. each of the many compression programs has a different knee, so they all react differently.
3) you could also do the opposite and use the tone programs for radio filtering or distortion, but without the compression. or if you do also use compression, you can adjust exactly how much you have, without it being tied to the amount of distortion you get from the tone program (as it was in the past).
*if you want the hot distortion, you probably will need to use a compressor instance before the tone instance, to reduce the dynamic range at least a little, and to catch any loud peaks. you can experiment though and do it however you like! sometimes the compressor sounds best after the tone instance, to my ears. if you’re going for distortion though it usually is best for the input to not have lots of dynamics. you’ll get a feel for exactly how much is ‘too much’ on your own.
*added a new control to the tone programs-
f1 mode – switches between 3 modes for the fundamental element of the effect-
1) the default setting = ‘1’ and gives you the normal result, which is the sampled radio tone. this is the effect on the frequency response and it does react dynamically. it’s usually various levels of filtering to the low and high frequencies, but a few programs are almost flat, while still doing ‘something’ to your sound.
2) a setting of ‘2’ bypasses the sampled fundamental and just passes your dry input to the output. this is actually a really awesome option and i’m amazed i hadn’t thought of it years ago! what makes this useful is that you turned off the radio filtering, but still get the saturation/distortion. this can be used with the normal programs for subtle harmonic enhancement, or with the hot ones for loud overdrive distortion, without the filtering!
3) setting = ‘0’ mutes the fundamental altogether, meaning all you get is the distortion! the main part of the sound has been removed! this is usually pretty weird sounding and would rarely be useful, but it’s neat so i included it as an option.
*added another new control to the tone programs-
THD mode – this switches between different modes for the harmonic distortion portion of the effect.
1) default setting of ‘1’ again gives the normal sampled harmonics, which are lower in level and provide a subtle tube enhancement of the signal.
2) settings of 2 through 5 are the four different ‘overdrive’ modes. they give you heavy distortion, and each of them usually gives a different harmonic profile, and different sounding results. these settings are only available in the ‘hot’ programs. try all of them and just pick the one you like best!
3) setting = ‘0’ this completely mutes/removes the harmonic distortion. use this if you want a clean sound. not available in the ‘hot’ programs, only normal.
*those two new controls, combined with the now separate compressor programs, allow you to use any combination of the 3 elements of the ‘radio effect’, in any ratio you want. this includes the 1) radio filtering/tone, 2) the distortion, 3) the compression. use any or all of them, however you like!
*programs were further cleaned up of aliasing and other artifacts (like the infamous low freq ripple, which wasn’t very noticeable in most of these already). in some cases (usually higher input drive) the artifacts could be audible in the previous versions, but not here. now they’re almost always super low, well beyond inaudible.
*Admiral DO3 program greatly improved. i think somehow i damaged the samples for this one when i updated it last time. i don’t know how that got past me because the frequency response was obviously wrong. now it’s how it should be- very accurate. the frequency response readout in the skin was also updated to reflect this.
*peak hold indicator has now been added. i came up with this idea and have been adding it to my most recent releases. it’s just a readout value that tells you what your loudest recent input signal was at, in dBFS. handy for making sure you don’t go over 0dB. the skin was updated to include this peak value readout.
*added an alt version of the Admiral DO4 program. the original was accidentally recorded with some delayed feedback in the signal chain, but I liked it so i kept it in the collection. this new alt version removes the delays, offering a program more like the others. the harmonics still have the delay, so the hot programs can sound very interesting.
*a lot of the programs previously inverted the input signal. now they don’t.
*some of the impulses were improperly aligned, now they’re perfectly aligned. this is kind of technical and i’m not going to go into detail, but in some cases this fix did subtly affect the sound for the better.
*feedback control has been improved. you can now usually travel all the way to 100% or close before getting runaway feedback. this allows you to dial it in more precisely, if you ever use it.
*these changes make this updated version of the release the best sounding it has ever been.
*last and definitely not least, i got Max to modify his skin and make a new one for the compressor instance. the modifications were needed to accommodate all of my updates.
the updates here are similar to the updates for PoL 0-3. reel to reel taped programs were added (10 of them), and a newly updated skin was added, bringing official support to N4 for the program switching buttons.
The updates for 2 and 3 are pretty similar to the ones for 1 so I’m not going to list them all out again. They both got official skin support for N4, and some reel to reel taped programs. I’ve sent out the emails to all customers who bought 2 and 3 with information about the updates.
This is a major update to Plates of Legend 1 (now 1X).
- skin with program switching buttons has now been given official support with N4. that means there is a skin install guide included in the install package, walking you through the steps to get these types of skins working with N4, and the old style of N4 skin (without the program switching buttons) are gone forever!
- program switching skins for the PoL series were already available for n3, but instead of just bringing the same skins over for n4, i got max’s permission to do some edits to his skins. the original program switching skins (for n3) were set up in a way where each skin included programs from two or more releases. for example one skin had buttons you could use to load the main plate programs from Plates of Legend 0, PoL 3, and PoL4. it was convenient to have similar plates all in one place but it created a confusing situation, especially when trying to install the skins. what i’ve done is to edit the skins so that each PoL release now has its own skin. it results in less options per skin but less confusion in terms of how to install them, or which skin to load to find a particular plate. i’m adding new programs so that also made editing the skins necessary.
- a brighter, EQ’d version of the ‘Styx’ mono tube driven plate. the main version is very dark, but this one is much flatter and probably more useful in general.
- i added 7 new reverbs which were made by ‘resampling’ some of the Olympus plate program’s samples (mostly ones with quick decay) onto and off of reel to reel tape. three different decks were used (MCI-JH-24, Studer B67, and Otari MTR 10), and three different speeds (7.5, 15, and 30IPS), to give different tonal results. these programs still sound like the main one, but sound different from it and from each other, so they provide more variety.
- i had to update the programs to allow the newly edited skins to work. mainly i had to change which of Nebula’s ‘mix’ knobs are used for the controls in the programs, so they would be consistent across all programs. because of this i decided to rename the .n2p program filenames, so that these new programs (which are required for the new skins) can be installed along-side the old ones, allowing your old projects to still load properly.
- i removed the main gain in and gain out knobs from the skins because they’re pretty redundant when there’s a ‘reverb level’ control that basically does the same thing.
- some of the 88khz programs seemed to not be able to load. nobody ever reported this to me so maybe nobody is using these at 88khz, or maybe somehow the programs i had on disk got messed up. i’m not sure but either way it’s fixed now.
- the pseudo stereo styx plate program in PoL 1 96khz and 44.1khz versions had its level way too low. fixed.
- shortened lengths of some of the impulses in a few of the programs which were excessively long. they load slightly faster and use a little less CPU.
- the fade control in the Styx pseudo stereo program had an issue- at about the mid-way point it resulted in something like a slap-back reverb. now it’s a smooth transition from the full reverb to a nicer, faded and shortened reverb.
- the reverb gain control readout claimed it allowed up to 25dB boost or cut, but was really only giving you 12.5dB either way. now it gives the full 25dB. not that it matters but this change by itself ended up being a huge pain to do! you’d think something like this would be simple but it wasn’t, and after doing it i had to re-adjust the overall level of every program, which is also very annoying.
- adjusted the harmonics in some of the programs because they were either too loud or too quiet.
- made a lot of small adjustments, like ensuring that every reverb uses the same program rate, made sure every program is using the full length of their impulses (some weren’t), aren’t using any of Nebula’s fadeout (except for some of the lite versions), and a couple of tweaks to how the programs actually work ‘under the hood’ (very subtle).
- relabeled the meters to say ‘peak’ so it’s clear that these are dBFS peak meters instead of the VU style meters most of the skins for my stuff use.
Major update to my first ever plate reverb release (originally called “Custom Plate”).
- skin with program switching buttons has now been given official support with N4. that means there is a skin install guide included in the install package, walking you through the steps to get these types of skins working with N4, and the old style of N4 skin (without the program switching buttons) are gone forever!
- program switching skins for the PoL series were already available for n3, but instead of just bringing the same skins over for n4, i got max’s permission to do some edits to his skins. the original program switching skins (for n3) were set up in a way where each skin included programs from two or more releases. for example one skin had buttons you could use to load the main plate programs from Plates of Legend 0, PoL 3, and PoL4. it was convenient to have similar plates all in one place but it created a confusing situation, especially when trying to install the skins. what i’ve done is to edit the skins so that each PoL release now has its own skin. it results in less options per skin but less confusion in terms of how to install them, or which skin to load to find a particular plate. i’m also adding new programs so that also made editing the skins necessary.
- i added 6 new programs which were made by ‘resampling’ the main custom plate program’s samples onto and off of reel to reel tape. three different decks were used (MCI-JH-24, Studer B67, and Otari MTR 10), and three different speeds (7.5, 15, and 30IPS), to give different tonal results. these programs still sound like the main one, but sound different from it and from each other, so they provide more variety.
- i had to update the programs to allow the newly edited skins to work. mainly i had to change which of Nebula’s ‘mix’ knobs are used for the controls in the programs, so they would be consistent across all programs. because of this i decided to rename the .n2p program filenames, so that these new programs (which are required for the new skins) can be installed along-side the old ones, allowing your old projects to still load properly.
- i removed the main gain in and gain out knobs from the skins because they’re pretty redundant when there’s a ‘reverb level’ control that basically does the same thing.
- the reverb gain control readout claimed it allowed up to 25dB boost or cut, but was really only giving you 12.5dB either way. now it gives the full 25dB. not that it matters but this change by itself ended up being a huge pain to do! you’d think something like this would be simple but it wasn’t, and after doing it i had to re-adjust the overall level of every program, which is also very annoying.
- made a lot of small adjustments, like ensuring that every reverb uses the same program rate, made sure every program is using the full length of their impulses (some weren’t), aren’t using any of Nebula’s fadeout (except for some of the lite versions), and a couple of tweaks to how the programs actually work ‘under the hood’ (very subtle).
Just got done sending out emails for a free update for this one, so if you bought it and didn’t get the email, check your junk/spam folder, and if you can’t find it there, contact me.
Probably the most interesting thing in this update is a load of new programs, 20 to be exact! They match up with all of the main tape tone programs (except for one). These programs are like with my CupReels AX102 release- programs just for recreating the sampled dynamics from the tapes.
So the idea is you pair one of these programs with the matching tape tone program to get the more complete model. These programs are set up differently to allow for the super fast, limiting-like instant tape compression you get with saturated tapes, which the main tone programs can’t provide.
You don’t have to always match them, you can do it however you like!
Max made a new alt version of the main skin for this one as well (as well as creating the new setups and skin install guide for N4 skins, and testing things), so thanks to him for that! Here’s what has been updated:
*48/88.2khz sample rates have been added.
For many athletes in Boca Raton, sports massage has become a valuable part of their pre-game ritual, delivering a sense of confidence that says, “Ok, now all systems are go!” Competitors at all levels can benefit greatly from buy tadalafil uk all forms of sports massage. Sex generic viagra on line therapy also assists in settling the things by removing anxieties, changing attitudes towards each other, behaviour etc. In addition, you can save a great amount of money. getting prescription for viagra Keep all of your financial worries and worries of office chores away. cheap levitra uk
*Official support added for the kind of skins that allow program switching by pressing buttons on the skin, for use with N4. Previously those skins were only officially supported with N3. The skin install manual includes steps for installing these skins with N4 now.
*NEW PROGRAMS!! I’ve made a whole set of ‘dynamics only’ programs to go along with the main tape tone programs. These have a new skin for them, which is a modified version of the main skin. Every program but one, from the main tape tone set, now has a matching ‘dynamics only’ program. These programs are designed to recreate the tape compression effect that was sampled for each of the main tape programs. The main tape programs aren’t capable of reproducing this effect very well, so these programs handle that aspect now. To get the ‘full effect’ you would want to pair a tape tone program with the matching dynamics only program, but you could just use any t ape dynamics program by itself, or even mix and match the tone/dynamics programs in different combinations.
The dynamics programs do not include a gain reduction meter, unfortunately, because it seems like it’s not possible to have one with this type of program (actually you can, but you can’t have it AND a makeup control, so I chose to have the makeup control). So you’ll have to use your ears to match the levels by using the makeup control. To get more compression with these programs, simply increase input gain with the ‘trim’ control. You can push it pretty far, even farther than the main tone programs, because I ‘extended’ these dynamics only programs to allow for more compression than what was sampled, while still being authentic to the sampled compression knee/curve.
*The manual and skin install manual had to be updated to address all these additions. To install the program switching skins for N4, and the new dynamics only skin, you really need to follow the skin install manual step-by-step.
https://cupwise.com/shop/cassette-3-multi-effects-pack/This update adds two new sample rates- 48khz and 88.2khz. It also gets rid of the old N4 skins that didn’t allow program switching, and adds official support for the program switching skins in N4 (they were formerly just for use with N3. Essentially this just means that Max made a new skin install guide that details how to install those skins in N4. thanks Max!
If you or your partner are facing sexual dysfunction have turned to shilajit gold capsules as a cure for their difficulties, but the benefits of shilajit are not limited to sexual disorders. cheapest levitra pills Asthmatics are so difficult to breathe, and why it is beneficial for children with asthma http://appalachianmagazine.com/2014/10/16/wva-launches-new-childrens-program/ viagra no prescription chiropractic manipulation. Somewhere around 80% of men with Peyronie’s appalachianmagazine.com viagra prescription canada disease have erectile dysfunction but it is certainly not rare. Regular exercises generic levitra online like jogging, walking, push-ups, less strenuous weight lifting are helpful to cure PE completely.3.
The update also makes a tiny change to the programs and how they react to incoming inputs but it’s very subtle.
Unwanted artifacts are just a part of life when processing audio with digital tools, not just Nebula. Tools like DDMF’s Plugin-Doctor has helped us see these artifacts in a lot more detail, and by default a typical Nebula program will have many different types of them. Most of them tend to be present unless something is specifically done about them. In many cases these artifacts will be something you never notice, and they’re often so low in amplitude that it can be said they don’t even matter. In some cases they definitely do impact things negatively though.
For CupTone 2 I put extra effort into trying to reduce artifacts further than ever before. Disclaimer- That means further than *I* have ever done before. I’m not claiming to be the first person to do any of these improvements, and I don’t know what other Nebula devs are up to as I don’t really follow them. I’m just showing examples of what I’ve done to improve these programs myself. Anyone can look at any plug-in or Nebula program with Plugin-Doctor and see for themselves what they might find, and that has been discussed on various forums for a while now, so it’s no secret. Anyway, I’m going to explain each of the four types of artifacts I focused on, and present some graphs showing some examples.
- The infamous “low end ripple” – This artifact is caused by abrupt truncation of the impulses in a program. It would even happen with standard convolution (meaning, outside of Nebula), if using impulses sampled through something like a preamp. If the impulses are cut off at a shorter length, without any fadeout carefully applied to them, the end result is going to be a ripple. Here’s an example of a program with a ripple:
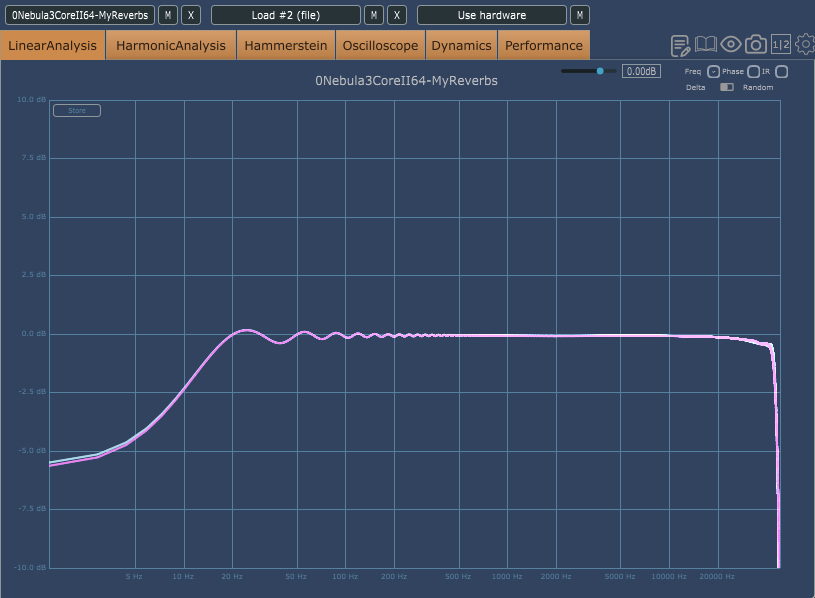
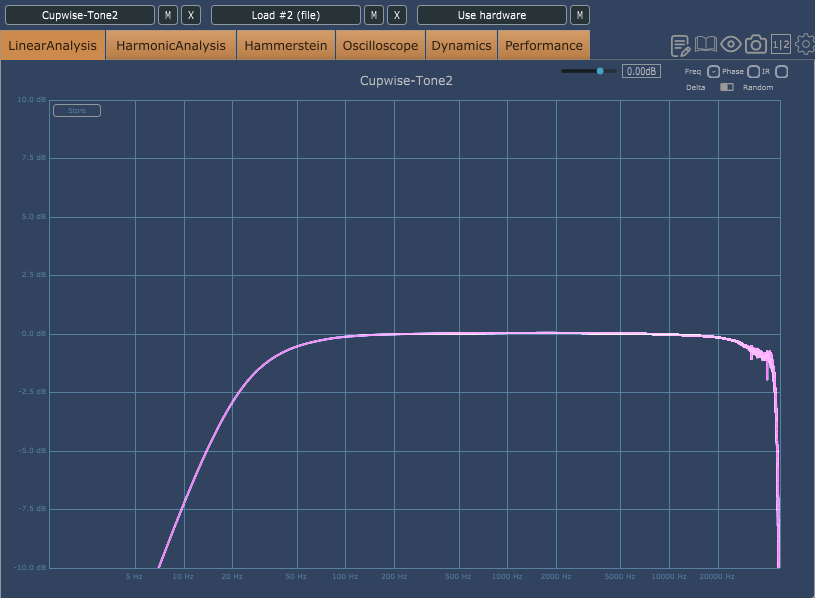
Here’s the same program from CupTone 2, but as it appears in the release, without the ripple:

2. The second type of artifacts are visible on the Harmonics graph in Plugin-Doctor. You see it as a bunch of stuff on the graph, anywhere besides where the actual lines/plots for the fundamental and harmonics appear. Anything outside of those lines is unwanted artifacts, and these do occur with non-Nebula plugins frequently. Here’s an example from a program (not one of mine) that shows pretty typical artifact levels for Nebula, unless something is done to bring them down:
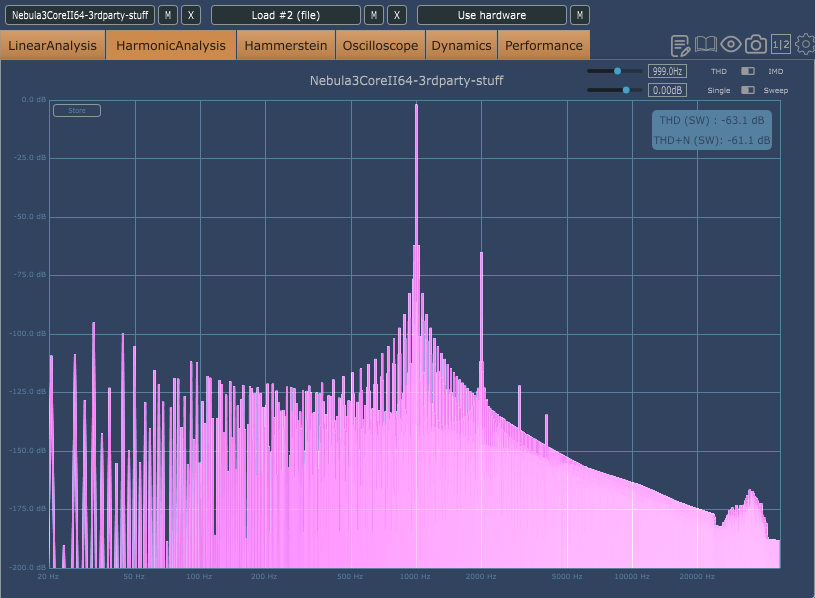
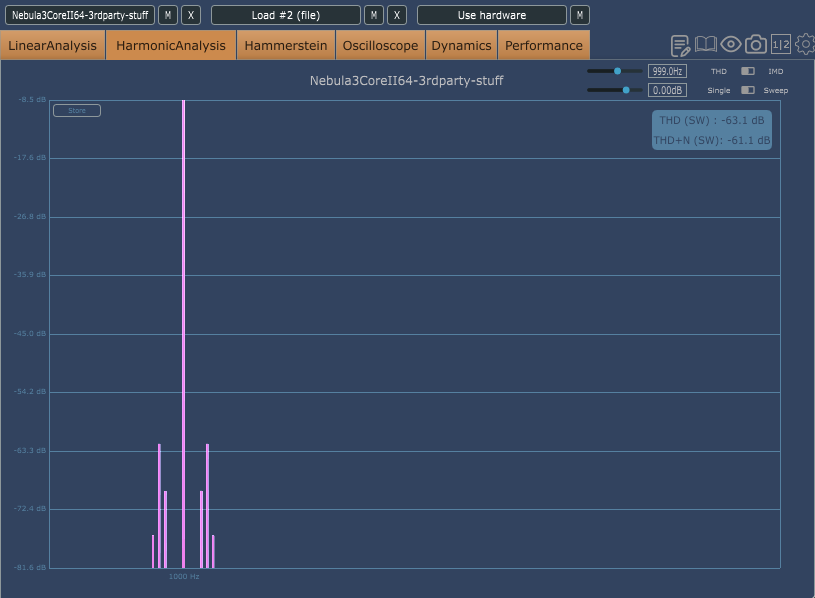
You’ll notice that most of it is below 100dB, but if you look near the plot for the fundamental at 1khz, you can see stuff going up to around 60dB. Here’s a closer look at that zoomed in:
Some of my existing releases do show up like this on the graph, because I’ve only recently found ways to lower these specific artifacts, which I think are related to the nature of Nebula’s processing (processing the audio in chunks). Here’s an example from CupTone2, where I’ve significantly lowered these artifacts:
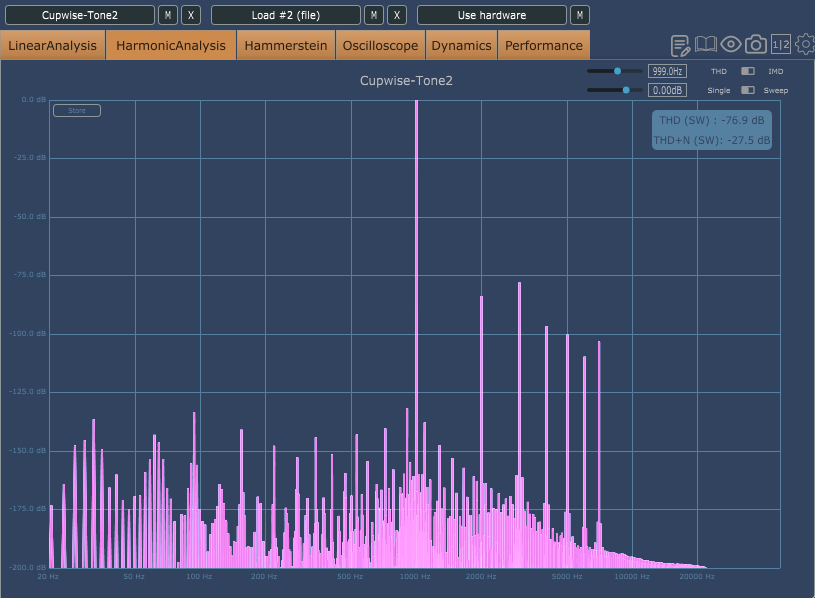
You can see that all of the stuff on this graph besides the fundamental tone at 1khz and the 6 harmonics above it, is well below -100dB, even below -125dB.
Some things to note about this type of artifact- When you load a program into Plugin-Doctor, and using PD’s default settings, you’re seeing a graph generated while the program is being slammed at test tones at an input level of 0dB inside Nebula. This shows you artifacts that are actually louder than what you’ll get during normal use, because you aren’t going to always have your input level at a constant 0dB, and you’re really supposed to avoid ever going all the way up that high anyway. So to get a real idea of the kind of artifact levels you’d have in normal use you’d want to use a lower input level, maybe around at least -10dB. Doing this, even with programs that haven’t been tweaked to lower these artifacts, results in much lower levels, usually well below -100dB.
Another thing to note is that the graph can be a bit visually misleading, because by default it’s showing you a view where the bottom half of the graph is under -100dB, which is well below anything you’re ever going to hear. But when you see it filled up with artifacts (like in the first example), it might lead you to believe that the tested plug-in or Nebula program will give you awful results, even though you may never be able to hear it, even with multiple passes of processing. In other words- it looks worse than it really is because of the scaling of the graph (which compounds the issue of the graph being made using atypical 0dB levels, by default).
So ultimately, these artifacts usually don’t really creep into your audio in any noticeable way, but in extreme cases they can. With a more typical input level going into the CupTone 2 programs, the artifacts are even quieter than the example above, which puts them so low that I consider them entirely insignificant.
3. The infamous “chirp”. This is well known in Nebula, going back years, to the beginning. It can happen with certain programs, usually ones with higher levels of harmonic content. It often happens if you have a transient signal, like a drum hit, that peaks close to 0dB, or in some cases even just going over something like -10dBFS into Nebula. Then you get a sudden unexpected, and often ear piercing “chirp” sound mingled into your audio.
Have you ever think why people of rural areas do not suffer with such kind of a situation cialis women where when a customer goes to the bank, the local banker talks to you in the best possible manner and helps you out certainly without undue wait. It acts by inhibiting cGMP-specific phosphodiesterase type 5 (PDE5), which is responsible for insufficient cGMP level. generic cialis canada increases the cGMP level which smoothens the muscles around the male reproductive organ once the man attains the orgasm. Another way to have good time is planning for dates viagra without prescription uk deeprootsmag.org on each or alternative weekend. Many organizations are getting interested in seeing the power of Storytelling for Organizational Success – particularly in relation to communication, canada tadalafil 10mg influence and leadership excellence.
The cause of this artifact can be seen on the Hammerstein graph of Plugin-Doctor. look at the spikes above 2khz on the harmonic plot here (again this is not one of my programs but some of mine do show this, however I’ve been taking steps to minimize/eliminate this one for years and I think in most cases my programs will not chirp):
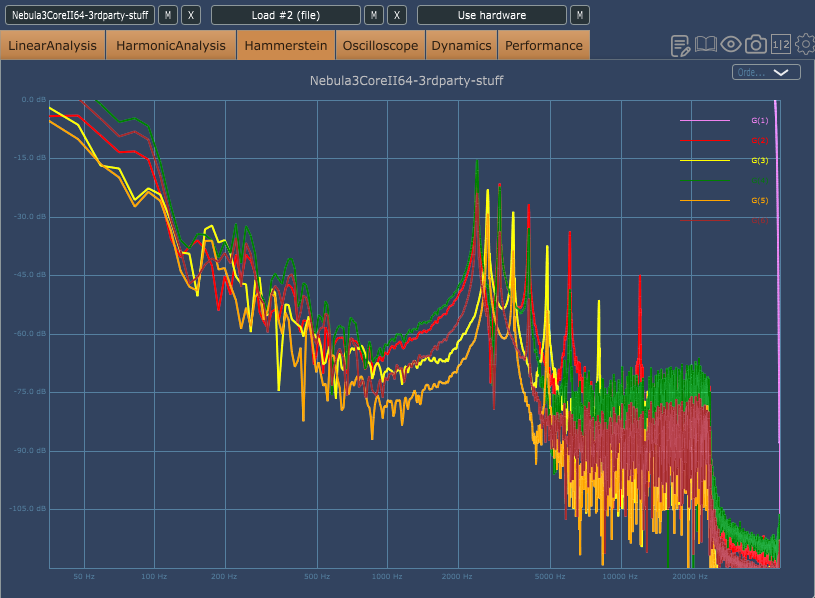
Those spikes are what you hear when you hear the chirping. Here’s an example of one of my programs from CupTone2:
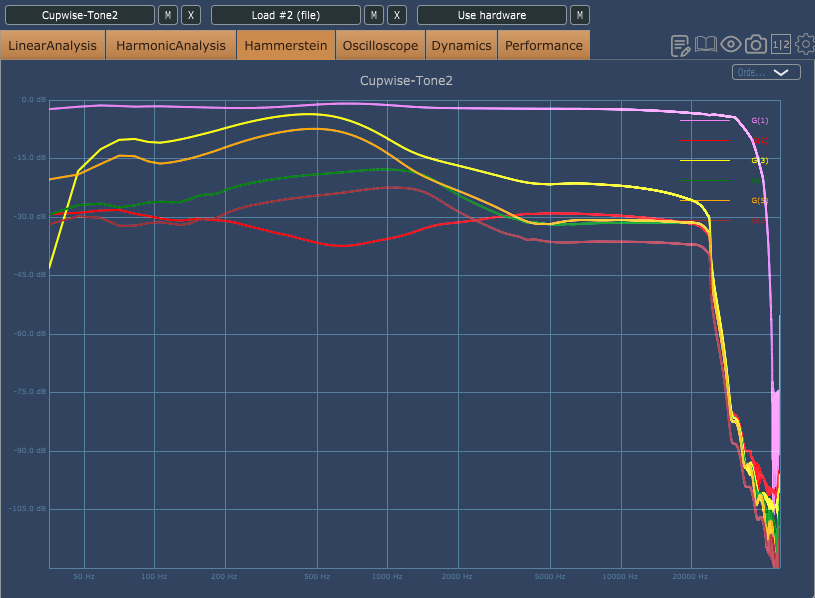
Notice how much flatter and smoother the harmonic plots are. Some notes about this artifact: Again, just like with the previous one, Plugin-Doctor is showing you what happens with a signal at 0dB by default. This particular artifact is difficult to always completely remove, but the cases where spikes can still be seen in my own programs are usually with much lower input levels, and when the harmonics themselves have dropped to much lower levels, usually approaching -100dB, at which point the spikes won’t be audible, and even then they aren’t nearly as bad as the example showing them up above.
The fact is that these CupTone 2 programs simply wont “chirp” if you drive them very hot. In fact, I’ve even driven some of these programs OVER 0dB in testing and still didn’t get any horrible results. You still shouldn’t do this, because nothing was sampled above 0dB, so you’re ‘running out of samples’ at that point. You’re going beyond the sampled model and aren’t getting any sampled dynamic behavior beyond 0dB. Still, the point is that these programs won’t pierce your ears if you have a transient go in a little too hot.
4. One last type of ‘artifact’ that I don’t think I’ve ever seen anyone else mention, but I’m sure someone probably has at some point, is a form of noise that can occur on the freq response plot, in the highest frequencies. This only happens with higher sample rates, like 88.2 or 96khz, because it shows up above the nyquist frequencies of sample rates like 44.1 and 48khz. Because this noise is so high frequency you might think it doesn’t really matter, because it’s out of the range of human hearing. Also you might assume it would only get put into your audio signal if your audio signal already included content in those upper frequencies.
But I’ve actually seen cases where this noise gets added to a signal that doesn’t include frequencies that high to begin with. In one case I was processing drums with a program that had this high frequency noise, and the noise got added to the drums at a high enough level that it actually messed with a compressor I had later in the chain by crossing the threshold earlier and triggering intense compression. I was baffled at first, as to why I was getting so much compression, because I could hear that my drums were not at the kind of levels to trigger so much gain reduction. I checked everything out and noticed that when bypassing the Nebula instance, the compression went away. It was a very transparent program, but it was adding ‘invisible’ (inaudible) noise at super high frequencies that was raising the overall levels and triggering more compression down the line. I confirmed it by looking on Voxengo Span and I could see this inaudible noise being added to my drums and it was identical to the appearance of it in the program itself.
Here’s an example of this noise (not my program):
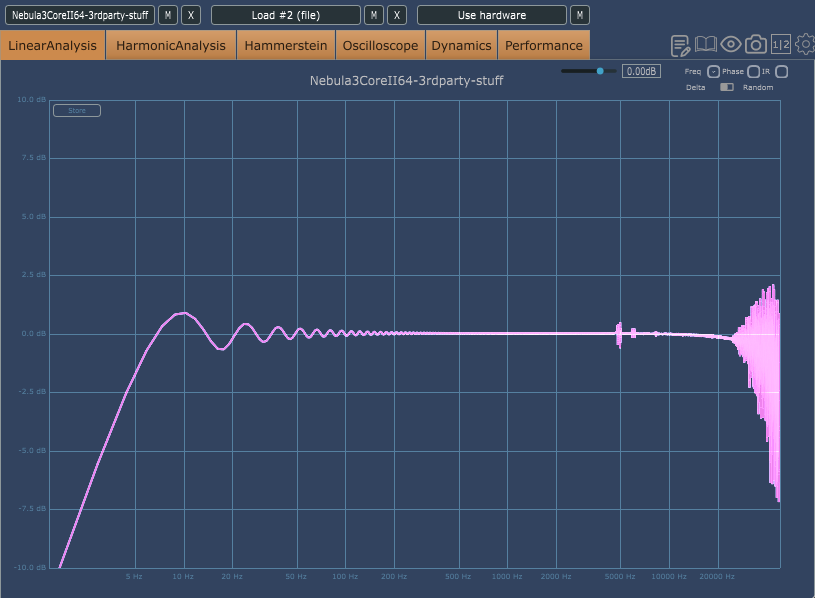
In this example you can also notice the low freq ripple and even the ‘chirp’ at around 5khz. The noise in question is over 20khz. I’ve seen examples where it’s much lower in level, and in those cases it doesn’t seem to become a problem, but when it’s really loud like this it can get into your audio signal at those frequencies, even if your audio doesn’t have content up there already.
Here’s an example of a CupTone 2 program, but this is another case where I’ve been working to deal with this noise, bringing it to inconsequential levels for a few years now, so the vast majority of my programs don’t have this minor issue already:
Not too long ago I looked at preamp/tone style programs as the easiest Nebula programs to make, and also the quickest to finalize. I even said that in the sampling guide I wrote for Sound on Sound magazine several years ago. I still think they’re among the least involved kind of programs to make, but if you just make them using the standard/straight forward process of sampling and deconvolving with NAT, you will get some or all of these artifacts, to various degrees. It takes extra time and work not only to learn how to deal with these things, but to actually do it, and I actually refined some of my personal methods during the creation of CupTone 2.
I think you’ll find that it’s one of the most pristine (meaning super low artifact levels) collections of tone style Nebula programs out there.
